Canadian Owned |

 Most canopy tents that get discarded could have been repaired for under $60. The rest fail for one preventable reason. They were stored while wet, or they were left standing in the wind without weights. So before you replace your tent, read this guide.
This guide explains canopy tent repair the way a professional repair shop approaches it. Identify the problem first. Start with the simple repairs. Then move to the structural ones. And understand when a repair makes financial sense, and when replacement is the better choice.
The advice here applies to both basic tents and commercial-grade custom canopy tents. We will explain the difference between the two later in this guide.
Why Regular Canopy Tent Maintenance Matters
Most canopy tents fail. There are multiple reasons for this.
A vendor uses the tent every weekend.
They never inspect the bolts. Over time, the bolts loosen. Loose bolts allow the joints to shift. Shifting joints crack the plastic brackets.
Then one strong gust of wind hits the cracked bracket, and the frame collapses. It looks like wind damage. But the real cause was a loose bolt, months earlier.
Perform a 90-second inspection at every teardown
Run your hand along each bar and feel for bends. Check each bracket for small cracks. In plastic, cracks appear as white stress lines. Confirm that no bolts or pins are missing.
Never store the tent while wet
Not even once. Moisture is what reduces a 7-year commercial frame to a 2-year frame.
Follow these two habits, and you will rarely need the repairs described below.
Bent or Damaged Canopy Frame
Locate the bend first
Remove the damaged bar and place it on a flat surface, such as a garage floor. Roll it. If it wobbles, it is bent. The section that lifts off the floor shows the exact location of the bend. This step is important. If you apply pressure to the wrong spot, you will make the bar worse.
How to repair a steel bar
For a minor bend, clamp the straight end to a workbench or hold it firmly. Then pull the bent section slightly past straight. Steel springs back a small amount, so you must go slightly beyond straight. Work slowly. Check the bar on the flat surface after each adjustment. Straighten it one time only. Bending the same spot repeatedly weakens the steel. A weakened bar will break later, often during an event.
Aluminum requires a different approach
A slight bow in aluminum can sometimes be corrected once. A sharp kink or crease cannot. The tube wall is crushed at that point. Replace the bar. A "repaired" kinked bar may survive one or two more events. Then it fails under load, with people beneath the tent.
The sleeve repair- Advanced method
If you need the tent before a replacement bar arrives, cut a 6-8 inch piece of steel tube or metal conduit that fits tightly inside the hollow bar. Position it over the bent section. Drill through both pieces and secure them with two bolts on each side. This section is now stronger than the original bar. Many professional event crews carry spare sleeves for this exact situation.
Torn or Worn Canopy Fabric
Avoid duct tape
Sunlight bakes its adhesive into the fabric. When the tape peels off later, it removes the waterproof coating with it. This creates a larger repair than the original tear.
Small tears (up to 3 inches)
Use a proper outdoor fabric repair tape, such as Tenacious Tape. The method matters more than the brand:
- Clean the area with rubbing alcohol and let it dry.
- Trim any loose threads.
- Cut the patch with rounded corners. Square corners always peel first.
- Apply a patch to both sides of the tear.
- Press firmly from the center outward.
- Wait 24 hours before folding the canopy.
Applied correctly, this patch will outlast the fabric around it.
Larger tears, or tears near a seam
Tape will slowly pull loose in these areas. The correct repair is a sewn patch. Use matching fabric (600D polyester for commercial tops). Sew it with a zigzag stitch, extending at least one inch past the tear on all sides. Then apply seam sealer along the stitch line on the underside. Any shop that repairs awnings or boat covers can complete this work for $20-40.
Advanced check know when the fabric is beyond repair
Grip the canopy near a corner and press your thumb into it. Healthy fabric resists the pressure. If it feels thin like paper, or if fibers crack when you fold it sharply, UV exposure has degraded the material. No patch will hold. The fabric around the stitching will simply tear away. At that point, purchase a replacement top instead of patching. If your frame is still in good condition, a new top is the most affordable upgrade available. It is also an excellent time to move from plain white to a printed top with your branding.
Broken Truss Bars and Connectors
The truss is the X-shaped scissor structure that allows the tent to open and close. It is also the area where basic tents and commercial tents differ the most.
Truss bars can be replaced individually
Each bar is secured by a bolt or a pin at each end. Photograph the assembly before removing anything. Reassembling a truss from memory, with the bars crossed incorrectly, is a common and frustrating mistake.
Measure before ordering a replacement: the length from hole to hole, the tube width, and the hole diameter. Bars from a 10x10 tent and a 10x20 tent look identical in photos. They are not interchangeable.
The plastic bracket problem
On basic tents, the brackets that connect the bars to the legs are plastic. They fail in two ways. They fracture in cold weather, below about -5°C, plastic becomes brittle. And they crack gradually at the bolt holes. Inspect for white stress lines at every bolt hole during teardown. A cracked bracket can complete one more event with a hose clamp tightened around it. But that is a temporary measure, not a repair. Order the replacement part.
Advanced insight
If the same bracket breaks twice, stop replacing it. The frame is indicating a deeper problem. That corner is carrying extra load, almost always because a nearby bar has a slight bend that has not been detected yet. Correct the bent bar, or you will purchase that bracket every year. This failure pattern is also the strongest argument for a commercial frame. Commercial frames use metal brackets, and metal brackets rarely fail.
Damaged Tent Legs
Legs bend in two predictable locations. Just above the foot plate, from the tent being dragged. And at the height-adjustment holes, from wind pressure. The holes are the weakest point of the leg.
A slight bow above the foot can be straightened using the same method as a truss bar, with one additional step. Hollow legs collapse easily when bent back. First, insert a snug wooden dowel or a smaller tube inside the leg. It supports the tube walls during the correction. Without internal support, the tube flattens. A flattened leg cannot be salvaged.
A bend at the adjustment holes requires replacement. No exceptions.
The holes already reduce the strength at that point. A bend there means the metal has failed. It will collapse under the next heavy load.
Broken snap buttons (the spring clips inside the leg) are a five-minute repair. Remove the old clip through the hole. Compress the new one and slide it into place. Keep two spares in your repair kit. They cost only a few dollars.
Advanced check, test with weight, not appearance
After straightening a leg, set up the tent. Press down firmly on that corner. Any creaking or visible flexing at the repair point means the metal is damaged internally, even if it appears straight. Trust the load test over a visual inspection.
Rust and Corrosion Issues
Orange surface rust is only cosmetic, for now
Remove it with a wire brush or scouring pad. Wipe the area dry. Then apply cold-galvanizing zinc spray. Do not use regular spray paint. Paint sits on the surface and traps moisture beneath it. Zinc actively protects the steel, the same way the original factory coating did.
The rust you cannot see is the rust that destroys frames
It develops inside the leg tubes and slider channels. It comes from storing the tent while wet. Twice per season, extend the legs and inspect inside the tubes with a flashlight. If rust powder falls out when you invert a leg, moisture is entering during storage. Correct your storage habits. Store the tent upright or on a shelf, never flat on a concrete floor. Concrete draws moisture up into the storage bag.
Advanced check, the scratch test
After removing rust, drag a key point across the metal. If the steel beneath is smooth, coat it and continue using it. If it is pitted with small craters, the metal has lost thickness. It is no longer reliable. On a leg or truss bar, pitting means replacement. Aluminum frames avoid this problem entirely. That is why vendors near the coast, or in rainy climates, should invest in aluminum despite the higher price.
Loose or Missing Hardware
This is the least exciting section in this guide. It also prevents the most failures.
Every setup and teardown vibrates the fasteners slightly looser. The habit to build: inspect every bolt once a month during the season. Ten minutes with one wrench. Two details matter:
- Replace lost nuts with nylock nuts (the type with a nylon ring inside), never plain nuts.
- Tighten them until snug, not fully compressed. Truss joints must pivot freely. A joint bolted rigid transfers all its stress into the bracket and cracks it.
Match the hardware exactly the same diameter, length, and thread. A bolt only 5 mm too long will interfere with the truss movement. You will notice it as an unexplained stiff spot and spend an hour locating it.
Assemble a small repair kit that stays in the tent bag: spare bolts and nylock nuts in your tent's sizes, two snap buttons, a hose clamp, zip ties, fabric repair tape, a multi-tool, and dry silicone spray. It costs about $25. It can save an entire event day.
Canopy Tent Leaks During Rain
First, identify the type of leak
There are three types, and each requires a different repair. Set up the tent on a dry day. Run a garden hose over the top while someone observes from below.
- Drips along the stitch lines = a seam leak
Apply seam sealer along the underside of the stitching. Allow it to cure overnight before folding the tent.
- A fine mist passing through the fabric = worn-out coating
Clean and dry the top. Then apply a waterproofing product designed for polyester. Two thin coats perform better than one heavy coat. On a frequently used tent, repeat this every one to two seasons.
- Water collecting in one spot, then seeping through = a tension problem
No spray or sealer will correct this. See below.
Correcting Water Pooling
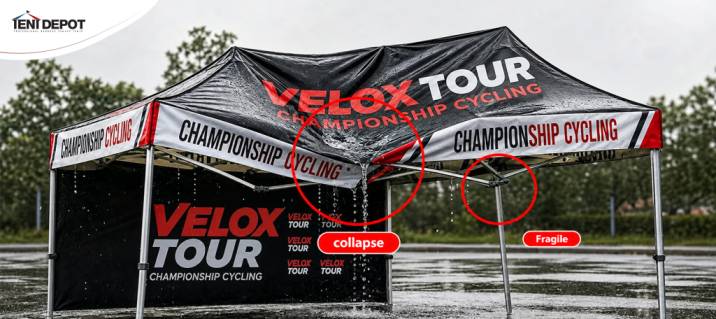
Pooling means the top is not tight on the frame. Confirm that all four corner pockets are fully seated and the Velcro straps are secure. If your frame has a peak-height adjuster, raise it until the fabric is tight like a drum. A tight top sheds water. A loose top can collect over 20 litres of water in a single sag. That weight can break a truss bar during a storm. If the top was tight when new but will not tighten now, the fabric has stretched. That means it is time for a replacement top. The 600D tops on Tent Depot's canopy packages arrive water-resistant and UV-coated from the factory. However, maintaining the coating after the first year is the owner's responsibility.
Difficulty Opening or Closing the Tent
The most important rule “ a pop-up tent should never require force”. If it resists, something is bent, dirty, or obstructed. Forcing it converts a $10 problem into a $100 problem.
In most cases, the cause is dirty sliders
Sand and grit collect in the channels where the leg sliders travel. This is a constant challenge for vendors working on beaches or gravel lots. Wipe the legs and the slider path clean. Then apply dry silicone spray only. Not WD-40, oil because oil-based lubricants attract dirt and grind against the slider. Silicone dries smooth and clean.
If the frame is clean and still binds, one bar is slightly bent, often too slightly to notice. Open the frame to the point where it sticks. Stand at one corner and look across the top of the truss. Every X of the scissor structure should appear identical. The one that appears different contains your bent bar. Remove it and roll it on a flat surface to confirm.
Advanced technique — proper handling
Open the tent with two people, at opposite corners, walking backward while lifting slightly. Keep the frame square throughout the motion. Never pull one side open alone. When closing, release all four leg sliders before compressing the truss. Compressing against a locked slider is the most common way brackets break.
When Should You Repair vs Replace Your Canopy Tent?
The calculation is straightforward:
- Always repair: one bent bar, one cracked bracket, a broken snap button, a small tear, seam leaks, surface rust, or stiff sliders. Parts cost $5–50, and the rest of the tent remains sound.
Calculate first: damage in two or more areas for example, a bent leg, plus two truss bars, plus a cracked bracket. Total the cost of the parts. The rule: if the repair exceeds half the price of a comparable new tent, replace it. A tent with damage in multiple areas experienced a significant event, wind, a collapse, or crushing during transport. There is almost always additional hidden damage. It will appear, one part at a time, over the following year.
Replace without hesitation: fabric that is thin and brittle across the entire top; deep, pitted rust on the legs or bars; a basic tent where the parts cost nearly as much as a new unit; or any frame that collapsed in the wind. A wind-collapsed frame is bent in a dozen hidden locations. Experienced repair shops decline these jobs for good reason.
Partial replacement is often the smartest option. A sound frame with degraded fabric only needs a new top. A damaged frame under a quality printed top only needs a new frame. And if you are purchasing your second basic tent, compare the long-term cost of a commercial-grade tent instead. Thicker tubes, metal brackets, and a genuine warranty. One commercial frame typically outlasts three basic ones. If you set up weekly, review trade show packages. Those frames are engineered for constant setup and teardown.
Tips to Extend the Life of Your Canopy Tent
- Dry the tent before storing it. No exceptions. If you pack up in the rain, set the tent up at home the next day to dry. Mold on the fabric and rust in the sliders both begin with a single instance of damp storage.
- Place weights on all four legs, every time. Use at least 15 lb per leg for a 10x10 in calm conditions. Double that amount in any breeze. Wind damage is not bad luck. An unweighted canopy is a 100-square-foot sail.
- Take the tent down when winds above ~40 km/h are forecast. No pop-up tent is rated for storms including commercial models. Taking it down requires ten minutes. A collapsed frame can cost a full season's profit.
- Fold the top loosely, and along different lines each time. Repeated folding on the same lines cracks the waterproof coating. Older tops often leak precisely along their usual fold lines.
- Apply silicone spray to the sliders and joints at the start of each season.
- Use the wheeled storage bag, and store it upright, indoors. The bag protects the frame during transport. Never store it flat on concrete.
- Perform the 90-second inspection at every teardown. It remains the most affordable repair tool available.
Most tent problems give early warnings before they become failures. A stiff slider. A white stress line. A bolt with slight play. Identify these signals early, and canopy tent repair stays a ten-minute task instead of an event-day emergency.
Need a replacement top, frame components, or a commercial upgrade? Tent Depot stocks parts and complete canopy packages in all common sizes, with Canada-wide shipping and a team that works with these frames every day.
Frequently Asked Questions
How do you repair a damaged canopy tent?
Identify the problem first, then begin with the simplest repair. Small tears: clean with alcohol and patch both sides with round-cornered repair tape. Tears over 3 inches: sew a patch and seal the stitches. Bent steel bars: straighten once, slowly, checking against a flat surface or add a metal sleeve for a repair stronger than the original. Kinked aluminum, cracked brackets, and bars bent at the bolt holes: replace them. Stiff frames: clean the sliders and apply dry silicone, never oil. Leaks: seam sealer for stitch lines, waterproofing spray for worn coating, and improved tension for pooling. And the rule above all others: never force a pop-up frame. Force converts a $10 repair into a $100 repair.
Can a canopy tent frame be repaired?
Usually, yes one component at a time. Truss bars, legs, brackets, sliders, and snap buttons can all be replaced on any quality frame. Minor bends in steel straighten reliably. Kinked aluminum and bends at bolt holes should be replaced instead. The one exception is a frame that collapsed in the wind. That frame is bent in more locations than an inspection can reveal. Repairing it piece by piece wastes money.
What tools are needed to repair a canopy tent?
For 95% of repairs: a wrench or socket set that fits your bolts, pliers, a rubber mallet, dry silicone spray, outdoor fabric repair tape, seam sealer, rubbing alcohol, rags, and spare hardware (nylock nuts, bolts, snap buttons, a hose clamp, and zip ties). For advanced repairs, add a wire brush and zinc spray for rust, plus a hacksaw, a drill, and a piece of metal conduit for sleeve repairs. The complete kit fits in a shoebox. It costs less than one truss bar with shipping.
How should a canopy tent be stored after an event?
Completely dry, loosely folded, upright, and indoors. Dry the fabric and the step most people skip, the inside of the leg tubes and sliders as well. Fold the top along different lines than the previous time. Bag the frame and keep the bag off concrete floors. Store small hardware in a zip pouch inside the bag, so it is available at 6 a.m. on event day rather than in a drawer at home.
When should I replace my canopy tent instead of repairing it?
Replace it when the parts cost more than half the price of a comparable new tent. Replace it when the fabric is thin and brittle across the entire top, not simply torn in one location. Replace it when the steel shows deep, pitted rust. And always replace it after a wind collapse. If you set up weekly and are now purchasing your second basic tent, upgrade to a commercial frame instead. Its metal brackets eliminate the plastic-bracket failures behind most of the repairs in this guide.